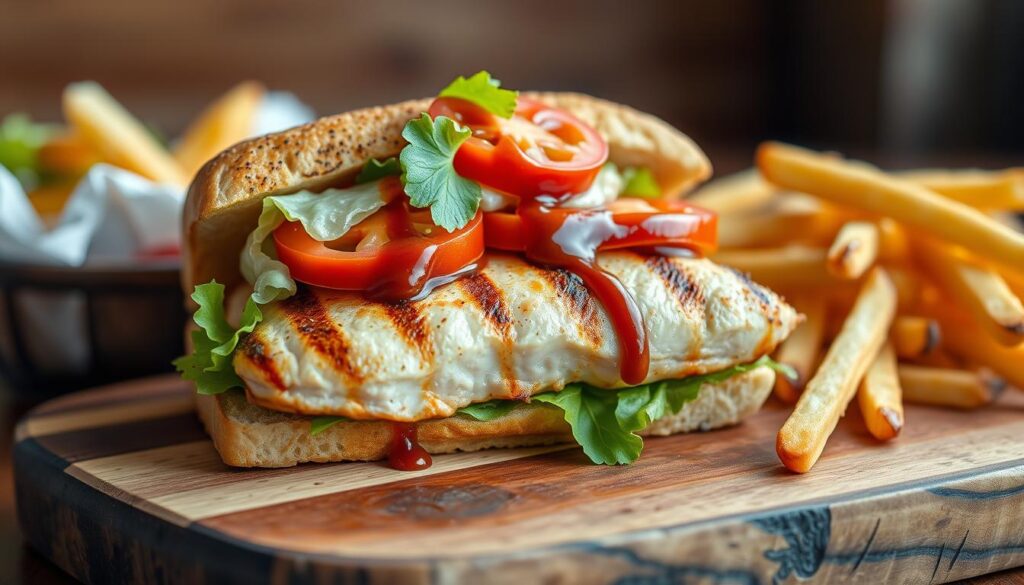
As a busy parent, finding quick, healthy meals for the family can be tough. But I’ve found a secret: the perfect Grilled Chicken Sandwich Recipe with A1 Sauce. It’s all about tender, grilled chicken and the bold taste of A1 steak sauce. This recipe turns the classic chicken sandwich into a masterpiece, making you wonder why you ever settled for less.
Key Takeaways
- Grilled chicken sandwiches offer a fast and simple meal option compared to eating out.
- Homemade grilled chicken sandwiches are generally cheaper than dining out.
- Marinating the chicken for at least 30 minutes enhances the flavor.
- Proper storage and meal prep techniques maximize convenience and time-saving benefits.
- Customization options allow you to tailor the sandwich to your personal taste preferences.
Why Make Homemade Grilled Chicken Sandwiches
Making your own grilled chicken sandwiches at home has many benefits. It’s cheaper than eating out and lets you control what you eat. You can pick the ingredients and how much you want.
Cost-Effective Alternative to Restaurant Meals
Grilled chicken sandwiches made at home save a lot of money. Buying ingredients in bulk and cooking yourself avoids restaurant prices. This makes homemade sandwiches a smart choice for meals.
Health Benefits of Home Cooking
When you cook your own sandwiches, you can choose better ingredients. You can avoid additives and control the amount of fat and salt. This makes your sandwiches healthier and helps your diet.
Control Over Ingredients and Portions
With homemade chicken sandwiches, you decide what goes in. You can pick lean chicken and add your favorite toppings. You also control the size, so you eat just the right amount.
Making your own grilled chicken sandwiches is a great choice. It’s cheaper, healthier, and lets you customize your meal. It’s a better option than buying them elsewhere.
Essential Kitchen Tools and Equipment
Creating delicious grilled chicken sandwiches at home is easier with the right tools. You’ll need a grill or cast-iron skillet, tongs, and a meat thermometer. These items help you make your sandwiches just like a restaurant.
Start by using a reliable grill or cast-iron skillet. A hot surface is key for great grill marks and juicy meat. Always preheat it well before cooking.
Tongs are crucial for handling the chicken without messing up its texture. Choose a pair with long, sturdy handles. This makes flipping the chicken easy and safe.
- A meat thermometer ensures the chicken reaches 165°F. This tool makes it easy to know when the chicken is done.
- A sharp knife, whether a chef’s knife or serrated bread knife, helps slice the chicken quickly. A cutting board is also important for a stable place to slice.
- To toast the buns, use a toaster oven or a traditional toaster. They make the buns golden and crispy.
With these grilling equipment and kitchen tools for sandwiches, you can make amazing grilled chicken sandwiches at home.
| Tool | Purpose |
|---|---|
| Grill or Cast-Iron Skillet | Cook the chicken to perfection |
| Tongs | Handle the chicken without disturbing the texture |
| Meat Thermometer | Ensure the chicken is cooked to a safe internal temperature |
| Chef’s Knife or Serrated Bread Knife | Slice the grilled chicken for the sandwiches |
| Cutting Board | Provide a stable surface for slicing the chicken |
| Toaster Oven or Traditional Toaster | Toast the buns to the perfect crispness |
With these grilling equipment and kitchen tools for sandwiches, you’re ready to make delicious grilled chicken sandwiches at home.
Ingredients for the Perfect Chicken Sandwich
To make the ultimate grilled chicken sandwich, you need top-notch ingredients. Start with juicy, boneless, and skinless chicken thighs. They taste better and are softer than chicken breasts.
Season the chicken with a mix of poultry seasoning, onion powder, garlic powder, smoked paprika, and chicken bouillon paste. This mix gives your sandwich a rich and balanced flavor.
Main Components
- 1 lb boneless, skinless chicken thighs
- Poultry seasoning
- Onion powder
- Garlic powder
- Smoked paprika
- Chicken bouillon paste
- Kosher salt and black pepper
- Garlic paste
- Mayonnaise
- Olive oil
- A1 steak sauce or Worcestershire sauce
Additional Toppings
For a better chicken sandwich, add some fresh and tasty toppings. Try sliced yellow onions, crunchy bell peppers in red, yellow, or green, and a bit of sugar for sweetness. Provolone cheese slices and tangy banana peppers make it even more appealing.
With these ingredients, you’re ready to make a grilled chicken sandwich that’s both delicious and impressive.
Grilled Chicken Sandwich with A1 Sauce Recipe
Make your lunchtime special with this tasty grilled chicken sandwich recipe and A1 sauce. It’s a healthier, cheaper option than eating out. You get to pick what goes in and how much.
Start by seasoning boneless, skinless chicken thighs with a mix of spices. Use poultry seasoning, onion powder, garlic powder, smoked paprika, and chicken bouillon paste. Cook the chicken in a skillet until it’s 165°F, about 5-7 minutes each side.
Then, cook yellow onions and colorful bell peppers in olive oil. Add a bit of sugar, salt, and black pepper. When they’re soft and caramelized, add A1 sauce to the chicken for extra flavor.
To make the sandwich, toast the buns and spread garlic mayonnaise on them. Add melted provolone cheese. Place the chicken and veggies on the bottom bun for a delicious grilled chicken sandwich.

This recipe is quick and easy, ready in about 30 minutes. Marinating the chicken for 30 minutes adds more flavor. You can keep leftovers in the fridge for up to 4 days.
Try different cheeses, breads, and toppings like mushrooms or pickled jalapenos. This homemade sandwich is just as good as one from a restaurant.
Mastering the Chicken Marinade
Take your grilled chicken sandwich to the next level by mastering the marinade. It’s all about finding the right mix of savory and tangy flavors. Use herbs, spices, and aromatics to make your chicken a true delight.
Marinade Ingredients
Start by combining the key marinade ingredients: olive oil, soy sauce, Worcestershire sauce, steak sauce, black pepper, lemon juice, minced garlic, brown sugar, and grated ginger. This mix will give your chicken a sweet, savory, and tangy taste.
Marination Time Guidelines
For the best taste, marinate the chicken overnight. But if you’re short on time, 4 hours will still add plenty of flavor. The longer it marinates, the more it absorbs the seasonings.
Storage Tips
- Put the marinating chicken in an airtight container or resealable bag to keep it safe in the fridge.
- Flip the chicken a few times while it marinates to make sure it’s evenly coated.
- Throw away any leftover marinade after you’ve used it, as it’s been in contact with raw chicken.
Don’t be afraid to try new things with your marinade. Add honey or brown sugar for sweetness, or dried herbs like thyme or rosemary for a different flavor. The world of chicken marinade and a1 sauce marinade is full of possibilities.
Perfect Grilling Techniques
To make the perfect grilled chicken sandwich, start by mastering grilling the chicken. Heat your grill to medium-high, about 375-450°F. This will give the meat a nice sear. Use a meat thermometer to check if the chicken is cooked to 165°F.
When grilling, flip the chicken only once. Let it cook for 5-7 minutes on each side. This ensures it stays tender and juicy.
To add more flavor, baste the chicken with A1 sauce in the last few minutes. This step caramelizes the sauce, adding a savory and tangy taste. Let the chicken rest for a few minutes before slicing. This helps the juices spread, keeping the flavors locked in.
“The key to a perfectly grilled chicken sandwich is a combination of high heat, precise timing, and a flavorful baste.”
By using these grilling chicken and bbq chicken sandwich tips, you can make a top-notch grilled chicken sandwich at home.

Building Your Sandwich Like a Pro
Making the perfect grilled chicken sandwich is all about how you put it together. Paying attention to every detail can make your homemade sandwich taste like it came from a restaurant. Here are some expert tips to help you build your sandwich like a pro and enjoy every bite.
Layer Order Guide
- Toast the hoagie rolls or buns to prevent sogginess.
- Spread a generous layer of garlic mayonnaise on the inside of the buns.
- Layer the cheese on the bottom bun, followed by the grilled chicken breast.
- Add your sautéed veggies, such as onions and peppers, on top of the chicken.
- Include any additional toppings, like banana peppers or extra A1 sauce, if desired.
- Gently press the sandwich together to compact the ingredients and create a cohesive bite.
Temperature Management
Keeping the right temperature is key for a perfect grilled chicken sandwich. Make sure your chicken is hot and your cheese is melted and gooey. For meal prep, wrap the sandwiches in foil to keep them warm and fresh until you’re ready to serve.
Assembly Tips
- Toast the buns to a light golden brown for optimal texture and crunch.
- Spread the garlic mayonnaise evenly across the buns to provide a flavorful base.
- Arrange the ingredients in a neat, organized manner for a visually appealing presentation.
- Press the sandwich gently to compact the layers and create a cohesive bite.
- Wrap the assembled sandwiches in foil to keep them warm and prevent the buns from drying out.
| Ingredient | Preparation | Quantity |
|---|---|---|
| Hoagie rolls or buns | Toasted | 4 rolls or buns |
| Garlic mayonnaise | Spread on buns | 1/4 cup |
| Grilled chicken breasts | Sliced | 4 breasts |
| Cheddar cheese | Sliced | 8 slices |
| Sautéed onions and peppers | Cooked | 1 cup |
| Banana peppers (optional) | Sliced | 1/4 cup |
| A1 Sauce (optional) | Drizzled | 2 tablespoons |
By following these tips, you’ll make a sandwich assembly that’s as good as your favorite restaurant’s chicken sandwich layers. Enjoy your homemade grilled chicken sandwich with the perfect mix of flavors and textures.
Customization Options and Variations
Creating the perfect grilled chicken sandwich is all about trying new things. You can stick to classic flavors or mix things up with bold new tastes. There are countless ways to make this dish your own.
Cheese Selections
- Provolone – for a mildly nutty and slightly tangy twist
- White American – for a creamy and melty addition
- Pepper jack – to infuse a subtle kick of spice
Tasty Toppings
- Avocado – for a creamy, buttery texture
- Crisp lettuce – to add a refreshing crunch
- Juicy tomato slices – for a pop of freshness
- Sautéed mushrooms – to amp up the savory notes
- Pickled jalapeños – for a fiery kick
Bread Varieties
- Whole wheat rolls – for a nutty, heartier base
- Ciabatta – for a crusty exterior and soft interior
- Low-carb wraps – for a lighter, more health-conscious option
Feel free to get creative with your chicken sandwich. Try it in a quesadilla or on a fresh salad for a lighter meal. The world of customized sandwiches is vast, catering to your unique tastes and dietary needs.
| Ingredient | Quantity |
|---|---|
| Ribeye Steak | 1 lb |
| Marinade Time | 30 minutes |
| Blackstone Griddle Temperature | Medium-high |
| Steak Cooking Time | 5 minutes |
| Hoagie Bun Toasting Time | 1 minute per bun |
| Cheez Whiz | 1/2 cup |
Exploring chicken sandwich variations lets you create a meal that’s truly yours. From choosing cheeses and toppings to selecting bread, the options are endless. This versatile dish is perfect for making your own unique dining experience.
Storage and Meal Prep Guidelines
Preparing delicious grilled chicken sandwiches doesn’t have to end with the final assembly. Proper storage and meal prepping techniques can help you enjoy these tasty treats for days to come. Whether you’re looking to save time or ensure your leftovers stay fresh, these guidelines will help you master the art of sandwich storage and meal prep.
Proper Storage Methods
To keep your grilled chicken sandwiches tasting their best, it’s important to store the components separately. Store the cooked chicken and any grilled vegetables in airtight containers in the refrigerator for up to 4 days. Keep the bread or buns in a separate container to prevent sogginess. When ready to assemble, simply reheat the chicken and vegetables before layering everything together.
Reheating Instructions
For the best results, reheat the chicken and vegetables in a skillet over medium heat until warmed through. This helps to revive the flavors and textures, ensuring your sandwich tastes just as delicious as the day it was made. Avoid microwaving the assembled sandwich, as this can make the bread soggy.
Make-Ahead Tips
- Prepare the chicken marinade and let it marinate overnight or for at least 4 hours for maximum flavor.
- Grill the chicken and vegetables in advance, then store them separately in the refrigerator.
- Assemble the sandwiches just before serving for the freshest taste and texture.
- Grilled chicken sandwiches can also be frozen for up to 3 months. Wrap them tightly in plastic wrap or foil before freezing.
By following these storage and meal prep guidelines, you can enjoy the convenience of homemade sandwich storage and meal prep sandwiches without sacrificing quality or flavor. Savor the taste of your delicious grilled chicken sandwiches even after the initial preparation.
Expert Tips for Restaurant-Quality Results
Making a professional sandwich like a gourmet restaurant’s is easy with a few tricks. Start by caramelizing your veggies in butter and sugar. This brings out their natural sweetness and pairs well with the savory grilled chicken.
For the chicken, let it rest for a few minutes after cooking. This helps the juices spread evenly, keeping the meat juicy. Thinly slicing the chicken also makes it blend well with the other ingredients.
- Caramelize vegetables in butter and sugar for added sweetness
- Let cooked chicken rest before slicing to retain juiciness
- Thinly slice chicken for better integration with other ingredients
To make the ultimate gourmet chicken sandwich, serve it right after you put it together. This keeps the texture and temperature of each part perfect. Use only the freshest, highest-quality ingredients for the best taste.
| Tip | Benefit |
|---|---|
| Caramelize vegetables | Enhances natural sweetness |
| Let chicken rest before slicing | Retains juiciness |
| Slice chicken thinly | Integrates better with fillings |
| Serve sandwiches immediately | Ensures optimal texture and temperature |
“Crafting a professional sandwich that rivals the flavors of a gourmet restaurant takes a few simple tricks.”
Conclusion
Grilled chicken sandwiches with A1 sauce are a tasty and flexible meal for any time. By using the tips from this article, you can make your own chicken sandwiches that taste great and are good for you. Try different flavors and toppings to make your sandwich just right.
A1 sauce makes the chicken even more delicious. Making your own sandwiches means you can choose what goes in them. They’re perfect for a quick dinner or a special lunch on the weekend.
Enjoy making your own chicken sandwiches and see what you can create. With the right tools and a bit of creativity, you can make a gourmet sandwich at home. It’s a healthier and more personal way to eat.


